Attention Please:
"
31 January 2015
9:10 PM
28 January 2015
2:22 PM
Apple iPhone iOS 8.1.3 Releases
Apple Releases iOS 8.1.3
8.1.3 (4S): iPhone4,1_8.1.3_12B466_Restore.ipsw
8.1.3 (5 GSM): iPhone5,1_8.1.3_12B466_Restore.ipsw
8.1.3 (5 GSM+CDMA): iPhone5,2_8.1.3_12B466_Restore.ipsw
8.1.3 (5c GSM): iPhone5,3_8.1.3_12B466_Restore.ipsw
8.1.3 (5c GSM+CDMA): iPhone5,4_8.1.3_12B466_Restore.ipsw
8.1.3 (5s GSM): iPhone6,1_8.1.3_12B466_Restore.ipsw
8.1.3 (5s GSM+CDMA): iPhone6,2_8.1.3_12B466_Restore.ipsw
8.1.3 (6+): iPhone7,1_8.1.3_12B466_Restore.ipsw
8.1.3 (6): iPhone7,2_8.1.3_12B466_Restore.ipsw
__________________________________________________ ____
8.1.3 (iPad 2 Wi-Fi): iPad2,1_8.1.3_12B466_Restore.ipsw
8.1.3 (iPad 2 GSM): iPad2,2_8.1.3_12B466_Restore.ipsw
8.1.3 (iPad 2 CDMA): iPad2,3_8.1.3_12B466_Restore.ipsw
8.1.3 (iPad 2 New): iPad2,4_8.1.3_12B466_Restore.ipsw
8.1.3 (iPad Mini Wi-Fi): iPad2,5_8.1.3_12B466_Restore.ipsw
8.1.3 (iPad Mini GSM): iPad2,6_8.1.3_12B466_Restore.ipsw
8.1.3 (iPad Mini CDMA): iPad2,7_8.1.3_12B466_Restore.ipsw
8.1.3 (iPad 3 Wi-Fi): iPad3,1_8.1.3_12B466_Restore.ipsw
8.1.3 (iPad 3 CDMA): iPad3,2_8.1.3_12B466_Restore.ipsw
8.1.3 (iPad 3 GSM): iPad3,3_8.1.3_12B466_Restore.ipsw
8.1.3 (iPad 4 Wi-Fi): iPad3,4_8.1.3_12B466_Restore.ipsw
8.1.3 (iPad 4 GSM): iPad3,5_8.1.3_12B466_Restore.ipsw
8.1.3 (iPad 4 GSM+CDMA): iPad3,6_8.1.3_12B466_Restore.ipsw
8.1.3 (iPad Air Wi-Fi): iPad4,1_8.1.3_12B466_Restore.ipsw
8.1.3 (iPad Air Cellular): iPad4,2_8.1.3_12B466_Restore.ipsw
8.1.3 (iPad Air China): iPad4,3_8.1.3_12B466_Restore.ipsw
8.1.3 (iPad Mini 2 Wi-Fi): iPad4,4_8.1.3_12B466_Restore.ipsw
8.1.3 (iPad Mini 2 Cellular): iPad4,5_8.1.3_12B466_Restore.ipsw
8.1.3 (iPad Mini 2 China): iPad4,6_8.1.3_12B466_Restore.ipsw
8.1.3 (iPad Mini 3 Wi-Fi): iPad4,7_8.1.3_12B466_Restore.ipsw
8.1.3 (iPad Mini 3 Cellular): iPad4,8_8.1.3_12B466_Restore.ipsw
8.1.3 (iPad Mini 3 China): iPad4,9_8.1.3_12B466_Restore.ipsw
8.1.3 (iPad Air 2 Wi-Fi): iPad5,3_8.1.3_12B466_Restore.ipsw
8.1.3 (iPad Air 2 Cellular): iPad5,4_8.1.3_12B466_Restore.ipsw
________________________________________________
8.1.3 (5G): iPod5,1_8.1.3_12B466_Restore.ipsw
2:07 PM
ResearchDownload_R2.9.9005 Release
Unknown
No comments
Research Downloadr_R2.9.9005 Release !
What's New ?

Download Link :-
User Shared - UPGRADEDOWNLOAD_R2.9.9009 Official Release
I shared - ResearchDownload_R2.9.9005 Release ! Share By AzimBahar
What's New ?
- Support 7715Nand specified by the Flash Block and Page size Download file
- Modify the Vol-Freq configuration page
- Increase the SC9620, Shark9620, SC77xx (nand) Configuration
- Modify the underlying code completely stripped COM architecture.

Download Link :-
User Shared - UPGRADEDOWNLOAD_R2.9.9009 Official Release
I shared - ResearchDownload_R2.9.9005 Release ! Share By AzimBahar
26 January 2015
9:27 PM
11:30 AM
SPD Cpu imei Repair Tool

- SC6600D
- SC6600M
- SC6600E
- SC6600I
- SC6600L1
- SC6600L2
- SC6600L3
- SC6600RT
- WT6226A
- SC6600R
- SC6600H
- SC6800
- SC8800D
- SC8800S
- SC6600R2
- SC6600H3
- WT6228
- SC6610/20
- SC6800
- SC6800H
- SC6820
- SC8800H
- SC6530
- SC6531
- SC6531a ( Not support any tool )
- SC8800G
- SC8801G
- SC8825 ( Not support any tool )
DOWNLOAD LINK
Normal mode Imei Repair
- Power on Phone
- Enable Usb debugging mode
- Connect phone to PC
- Select port
- Press Mode select
- Set “Normal mode”
- Write imei
- press write
Calibration Mode Imei Repair
- Take usb cable and cut the vcc connection ( Red Colour Vire )
- Press Mode select
- Set ” Calibration Mode “
- Write imei
- Connect Usb cable without battery
- Press write
- Inset battery
25 January 2015
11:44 AM
BlackBerry Z10 / Z30 OS 10.x.x.x official autoloader updated here
BlackBerry OS 10.x.x.x official autoloader for Z10 / z30

Installation Tutorial
* Switch off your BlackBerry 10 device
* Run the AutoLoader File
* Connect your BlackBerry 10 Device to your PC via USB
* Quickly Turn on your BlackBerry 10 device
* The AutoLoader will detect your device and starts the installation
* Please hold till the AutoLoader reaches to 100% and CLOSES automatically
* Disconnect your BlackBerry 10 device and wait till it starts again
Downloads
BlackBerry OS 10.1.0.1845 official autoloader
STL100-1:
STL100-2:
STL100-3:
STL100-4:
Latest updated versions
Z10 models 100-1, -2, -3, -4: Download the 10.1.0.4537 OS
Z10 models 100-1: Download the 10.1.0.4633 OS
Z10 models 100-2, -3, -4: Download the 10.1.0.4633 OS
Z10 models 100-2, -3, -4: Download the 10.1.0.4687 OS
Software version 10.2.1.2102
Z10 model STL100-1: Download
Z10 models STL100-2, -3, -4: Download
Z10 OS 10.2.1.2234 latest updated
Z10 (STL100-1)
Z10 (STL100-2, 3, and 4)
BlackBerry Z30 Latest
Download Z30-10.2.1.2234+2235Radio Download
24 January 2015
23 January 2015
10:31 AM
All Kind Of Computer , Laptop & Notebooks Etc Driver
DriverPack Solution 14.14 (2015) 2014 End Version Release
DriverPack Solution 14.14 Release !
Support :
Add lot of latest Computer , Laptop & Notebooks Etc Driver Even windows no matter
Torrent Link - DRP_14.14_Full
Direct Link - DRP_14.14_Full
Officia - DriverPack Solution - Best Drivers installation Software
Unpack Tools - :
DAEMON Tools Lite v4.49.1

DriverPack Solution 14.14 Release !
Support :
- Computer (All kind Of)
- Laptop (All kind Of)
- Notebooks (All kind Of)
Add lot of latest Computer , Laptop & Notebooks Etc Driver Even windows no matter

Torrent Link -
 DRP_14.14_Full
Direct Link -
 DRP_14.14_Full
Officia - DriverPack Solution - Best Drivers installation Software
Unpack Tools - :
DAEMON Tools Lite v4.49.1

18 January 2015
8:49 PM
Miracle Box 1.99 Download here
MIRACLE
BOX
Released 1.99
17th January 2014
BOX
Released 1.99
17th January 2014
What New in Update:
✔ 1.MTK Add Bootloader Unlock.
✔ 2.MTK Add Android Anti-theft code reset(beta).
✔ 3.MTK Add 6571 Nand Flash scatter file Write.
✔ 4.MTK Improve Android Format.
✔ 5.SPD Improve 8810/6820 format.
✔ 6.Blackberry Improve Read info.
✔ 7.Android Root (ADB) Add New method and support More phones.
✔ 8.Android Add Boot loader Unlock.
17 January 2015
2:01 PM
Internet Download manager 7.1 Full Crack Without Registration
IDM 7.1 Full Crack Version .. No need Registration..
Internet Download manager 7.1 Download here
14 January 2015
11:42 PM
maxis maxpro tab flash file
FIRMWARE- FaaastJB-v2.5-full - Download - 4shared - Toxic RR
TOUCH DRIVER- maxis max pro driver - Download - 4shared
STEP BY STEP FOR INSTALLING TS MODULES:
You need to have ADB installed before proceed
1. Flash FaaastJB with Livesuit 1.11
2. Wait for tablet to boot and load
3. Connect your tablet to PC
4. Extract all content from TS MODULE archive to a directory
5. Execute run.bat
6. After press any key dialog the tablet will reboot
7. That's all folks
11:25 AM
Symphony W15i 3G Hang one Logo and IMEI Solution 100000% Tested Solution
Symphony W15i 3G Hang one Logo Done
And IMEI Done
* No need NVM File
* No Need IMEI Write Tools
* And Others Software
History : My Problem Hang one logo
I try Full flash Original official Flash File But Not Solve
Then Try Format With Sp flash Tools And Flash But Not solve
Just Use This Flash File And flash Tools All Problem Solve
USE This File Download here
USE This Tools Download here
Note: All Flash Complete Then You Can See IMEI Null.. No Tension Just Hard Reset Then Problem Solve
Hard Reset Solution
Attention please : This File Password Protected
13 January 2015
9:40 PM
World First scientific Camera Calculator For Lumia
md_musa
No comments
World First scientific Camera Calculator for Lumia.
PhotoMath
PhotoMath is the world's first camera calculator. Just point the camera towards a mathematical expression, and PhotoMath instantly displays the correct result.

By pressing the steps button, you can see the full step-by-step solution. Use it to get help when you're stuck solving a math problem.

Children can use it as a tool which helps them to learn Math, while parents can use it to check their children's homework. With PhotoMath, you can have a Math teacher in your pocket.

PhotoMath currently supports basic arithmetics, fractions, decimal numbers, linear equations and several functions like logarithms. Support for new math is constantly added in new app releases.

Handwritten text is not supported, only printed problems from Math textbooks.
- Math recognition and solving has further been improved.
- Added clarification about handwritten text in help screens
- Added a more clear message when using a device that does not support autofocus
- Camera macro-mode has been enabled so expect the app to have less problems focusing on close text
- Math expressions now dynamically scale to fit the screen so there is no more need for scrolling in the steps screen

Expect more updates to come!
Download Photo Math
08 January 2015
10:54 PM
10:35 PM
STRAWBERRY CAKE FLASH FILE
STRAWBERRY CAKE FLASH FILE 100% OK

Hardware version:CA01
Software version:0001
CPU TYPE:625A
Internal version:8000
Boot downloading(1)...100%
Flash ID: 00C80060
Flash Type: SF_GD25LQ64
Chip Capacity: 0x800000(8MB)
STRAWBERRY CAKE - Download - 4shared
Flash ID: 00C80060
Flash Type: SF_GD25LQ64
Chip Capacity: 0x800000(8MB)
STRAWBERRY CAKE - Download - 4shared
07 January 2015
2:45 PM
phoenixusbpro flashing guide for new user
Things you may Need (The ones marked with a * are not optional):
- Stock firmware ROM*
- PhoenixSuit Key*
- PhoenixUSBPro* (Even if people keep calling it PhoenixSuit, thats its name when you install it)
- Semi-bricked Tablet* (Stuck on Logo, Cant enter recovery, etc.)
- Windows XP x86 or Windows 7 x86 / x62 *
- Patience**
This is a READ FIRST and READ-WHILE-ON-IT tutorial, Make sure to READ IT FIRST and then you can read it while youre doing it. If you attempt to do it while youre reading it without reading it first you'll be propense to make tedious mistakes.
Let's get on it.
Install PhoenixUSBPro and once its installed, open it.
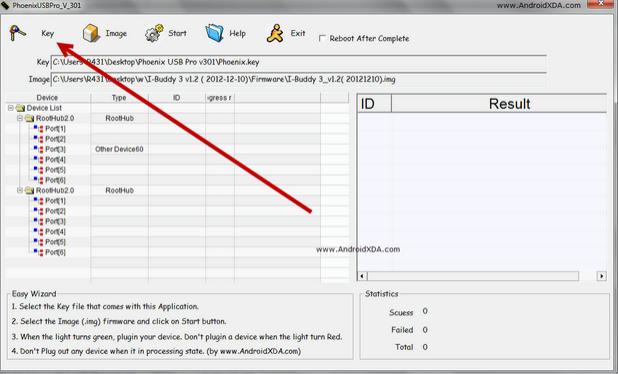
Phoenix is just like livesuit but they have a bigger interface, youll see the task buttons on top:
Key file | Image | Debug View | Start | Help | Update | Exit | []reboot
below it shows your USB Hub status (internal and external)
and on the right side theres a box to hold your failed or succededly flashed devices.
DONT connect your tablet yet.
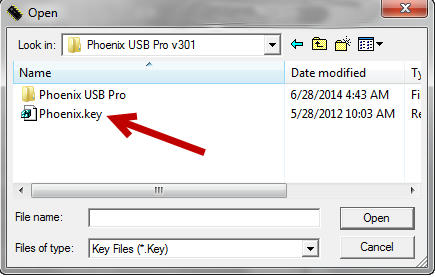
Press the key file button and navigate to where your Key file is and double click on it to select it.
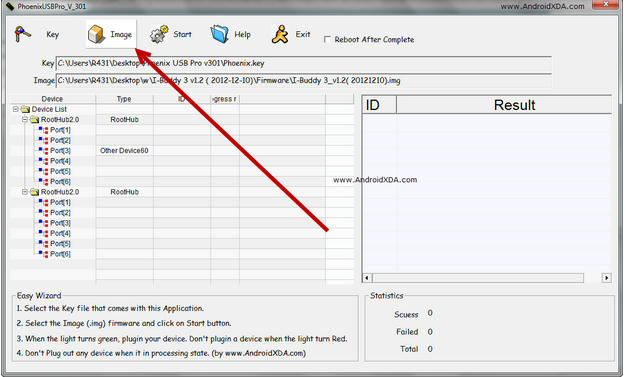
Press the Image button and navigate to where your *.IMG Stock firmware rom file is and double click on it to select it.
Youll see a (X) red Icon on the right. Dont mind it yet.
DONT connect your tablet yet.
Press Start. The red Icon should have turned to GREEN. If it didnt, something went wrong, they key file or the *.IMG rom file are damaged, corrupted, downloaded wrong or they are invalid. Search for a working ROM or start again the tutorial.
(Most of the times it should do just fine).
after the Icon has turned green, we are ready to connect our device.
First connect your USB Cable to your computer and leave your tablet disconnected
Make sure your tablet is completely turned off.
Before connecting your tablet, press the Volume+ button (or search your device's FEL Button on google / Linux-sunxi) for the Q88Pro, and Q8H is Volume+, probably for others the same.
Ok, Hold the Volume+ button pressed down and connect your USB Cable to your Tablet (While holding the Volume+ button down).
Right after connecting your USB Cable into your tablet (without releasing the Volume+ Button) Start pressing your POWER button repeatedly, One time every second.
At the sixth time (for some devices you need to press it 10 times or more) it will pop in your USB Hub interface box a device. Wait a few and it will appear your connected tablet.
It will say: Your device's queued ID and the process percent.
Mostly starts fast til 7% and then it continues to 53% then it does the job.
It'll take about 2"5 mins so be patient I know you want your tablet restored.
After its done it will appear on the right box if it succeeded or failed and the time the flashing took.
now you can press Stop and disconnect your tablet.
In the FEL Mode, even if your tablets screen is deep black, it might be still turned on.
So firstly try to turn it on normally holding your power button for about 3 to 5 seconds, if nothing seems to happen you need to force-shutdown first, for it: hold your power button for about 10 to 15 seconds. After that your tablet should be powered down, proceed to turn your tablet on. VOILA!!, good work guys.!
1st Downlod Letest Flasher From here : https://www.mediafire.com/#x4ov52e9scx5f
NT: Letest Phonixcard also can flash a23 available on following link
Here we go Phoenixusbpro flashing guide :
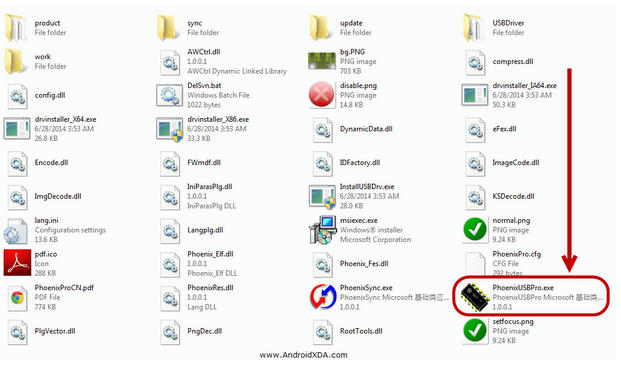
1. open phoenixusbpro folder and open PhoenixUSBPro.exe
[for win 7 user run as Adminishtrator ]
2.Click no key bottom from top
3. select key file from phoenixusbpro key folder [ only for 1st time farther when you use it will auto detect key file ]
4.now click to image button and select downloded firmware
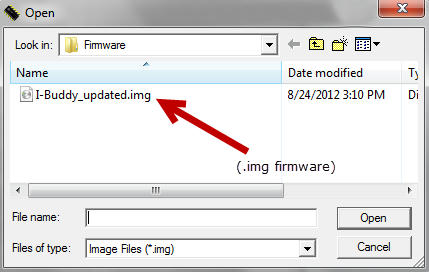
5.now after select image click to start button
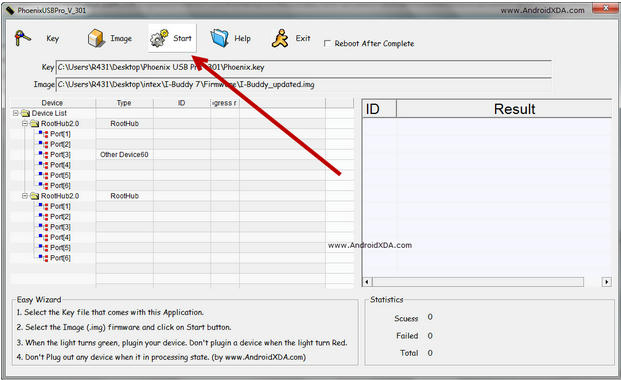
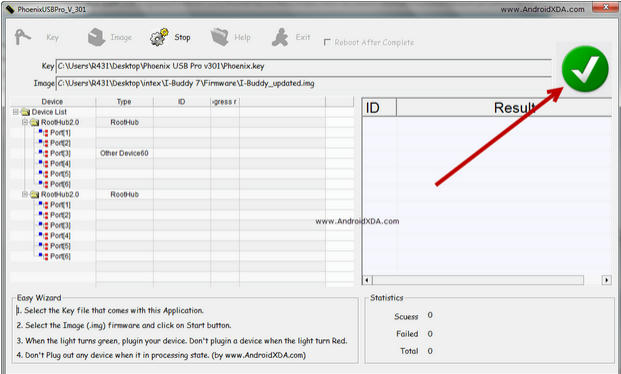
6.after select start you will see a green trick mark at and of left side
this mean all ok you are ready to flash your tablet
8.final stage you have to force tablet in flash mode by key combintions [its same as livesuit flashing stage ]
HOLD on vol + or - key then connect usb to tablet and quickly keep pressing power button few times 10-15-20 you will see flashing process started software will detect your tab usb
and wait for finished massage
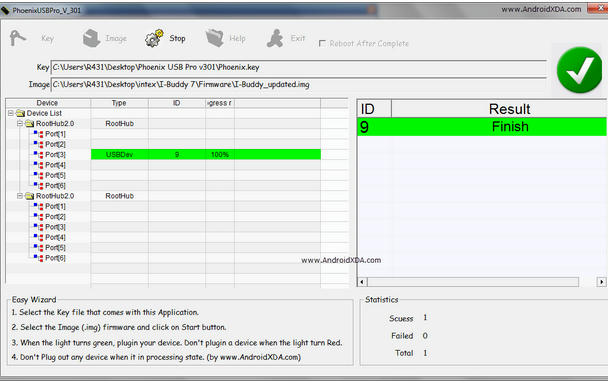
All done now disconnect and power on your tablet ..........
- Stock firmware ROM*
- PhoenixSuit Key*
- PhoenixUSBPro* (Even if people keep calling it PhoenixSuit, thats its name when you install it)
- Semi-bricked Tablet* (Stuck on Logo, Cant enter recovery, etc.)
- Windows XP x86 or Windows 7 x86 / x62 *
- Patience**
This is a READ FIRST and READ-WHILE-ON-IT tutorial, Make sure to READ IT FIRST and then you can read it while youre doing it. If you attempt to do it while youre reading it without reading it first you'll be propense to make tedious mistakes.
Let's get on it.
Install PhoenixUSBPro and once its installed, open it.
Phoenix is just like livesuit but they have a bigger interface, youll see the task buttons on top:
Key file | Image | Debug View | Start | Help | Update | Exit | []reboot
below it shows your USB Hub status (internal and external)
and on the right side theres a box to hold your failed or succededly flashed devices.
DONT connect your tablet yet.
Press the key file button and navigate to where your Key file is and double click on it to select it.
Press the Image button and navigate to where your *.IMG Stock firmware rom file is and double click on it to select it.
Youll see a (X) red Icon on the right. Dont mind it yet.
DONT connect your tablet yet.
Press Start. The red Icon should have turned to GREEN. If it didnt, something went wrong, they key file or the *.IMG rom file are damaged, corrupted, downloaded wrong or they are invalid. Search for a working ROM or start again the tutorial.
(Most of the times it should do just fine).
after the Icon has turned green, we are ready to connect our device.
First connect your USB Cable to your computer and leave your tablet disconnected
Make sure your tablet is completely turned off.
Before connecting your tablet, press the Volume+ button (or search your device's FEL Button on google / Linux-sunxi) for the Q88Pro, and Q8H is Volume+, probably for others the same.
Ok, Hold the Volume+ button pressed down and connect your USB Cable to your Tablet (While holding the Volume+ button down).
Right after connecting your USB Cable into your tablet (without releasing the Volume+ Button) Start pressing your POWER button repeatedly, One time every second.
At the sixth time (for some devices you need to press it 10 times or more) it will pop in your USB Hub interface box a device. Wait a few and it will appear your connected tablet.
It will say: Your device's queued ID and the process percent.
Mostly starts fast til 7% and then it continues to 53% then it does the job.
It'll take about 2"5 mins so be patient I know you want your tablet restored.
After its done it will appear on the right box if it succeeded or failed and the time the flashing took.
now you can press Stop and disconnect your tablet.
In the FEL Mode, even if your tablets screen is deep black, it might be still turned on.
So firstly try to turn it on normally holding your power button for about 3 to 5 seconds, if nothing seems to happen you need to force-shutdown first, for it: hold your power button for about 10 to 15 seconds. After that your tablet should be powered down, proceed to turn your tablet on. VOILA!!, good work guys.!
Tested Solution
1st Downlod Letest Flasher From here : https://www.mediafire.com/#x4ov52e9scx5f
NT: Letest Phonixcard also can flash a23 available on following link
Here we go Phoenixusbpro flashing guide :
1. open phoenixusbpro folder and open PhoenixUSBPro.exe
[for win 7 user run as Adminishtrator ]

2.Click no key bottom from top

3. select key file from phoenixusbpro key folder [ only for 1st time farther when you use it will auto detect key file ]

4.now click to image button and select downloded firmware


5.now after select image click to start button

6.after select start you will see a green trick mark at and of left side
this mean all ok you are ready to flash your tablet

8.final stage you have to force tablet in flash mode by key combintions [its same as livesuit flashing stage ]
HOLD on vol + or - key then connect usb to tablet and quickly keep pressing power button few times 10-15-20 you will see flashing process started software will detect your tab usb
and wait for finished massage

All done now disconnect and power on your tablet ..........
06 January 2015
3:03 PM
Symphony w21 3g Flash and Unlock
Note: My phone Problem Phone Lock
User Data Delete But not Solve
Format with Volcano Box But Not Solve
Write Flash But Not Solve
Then Apply This Solution
Phone format and flash I use This File
Download Here
Password Click Here
First format whole flash with sp flash tools
User Data Delete But not Solve
Format with Volcano Box But Not Solve
Write Flash But Not Solve
Then Apply This Solution
Phone format and flash I use This File
Download Here
Password Click Here
First format whole flash with sp flash tools
Then write full flash with sp flash tools
flash file link..... Download Here
after full flash chek imei null.
then write imei with volcano
100% tested by Shohag GSM
05 January 2015
3:05 PM
2:22 PM
Miracle Advance Android Tool V1.2 - Cracked By DzCraXx
[ Miracle Advance Android Tool V1.2 ] - Cracked By DzCraXx - First in the World's forums.
A Little Info about this tool :)
Miracle Advance Android Tool V1.2
--------------------------------------------
1. Connect/ReadInfo/Unlock Android All Mobile (Android)
2. Super Speed Connect in Micro Seconds
3. Root 4 Method all Generic Technology
5. Samsung MTP UNLOCK Pattern/Password/PIN NO USB DEBUG REQUIRE.
6. Remove Face Lock
7. Remove Voice/Facelock - Comes in Most Android 4.x
8. Remove Signature Lock - comes in New Samsung Note 3 Series.
9. Remove Finger Print Lock - comes in New Samsung S5 Series
10. Batch Apk Installer - Both Internel / Externel Memories / Force Mode
SAMSUNG Android
- No Need USB Debug Required
- Remove Pattern Unlock
- Remove Password Unlock
- Remove Pin Unlock
Nokia Android Tool
- Added Read Info
- Rebooter - Fastboot - Normal - Cwm
- One Click Root
- Install Kitkat Launcher
- Install Google Services
- Uninstall Google Services
- Flash ClockworkMod Recovery
- x Flasher
- Flash Boot,Recovery,System,variant,Data,Cache,preload..
Root Tool
- Manual Root 4 Methods (Support Wide Range of Devices)
- Smart Root Tests All Availble Exploits with one Click
Maat Pro Editor Tool
- Read/Backup/Edit Gps.conf
- Read/Backup/Edit Hosts
- Read/Backup/Edit/Update Latest Hosts
- Read/Backup/Edit Build.Props
- Read/Backup/Edit Hw-config
And it's all free for you...
Software Picture :

Software & Crack link :
Miracle_Advance_Android_Tool_v1.2 - Cracked
Download
MAAT_1.2_LOADER_DzCraXx
Download
* How to install and run :
1 - Install Maat 1.2.exe
2 - copy MAAT_1.2_LOADER_DzCraXx.exe to install folder [C:\Program Files\Maat]
3 - double-click MAAT_1.2_LOADER_DzCraXx.exe
N-Joy ! this fine release from DxCraXx.
A Little Info about this tool :)
Miracle Advance Android Tool V1.2
--------------------------------------------
1. Connect/ReadInfo/Unlock Android All Mobile (Android)
2. Super Speed Connect in Micro Seconds
3. Root 4 Method all Generic Technology
5. Samsung MTP UNLOCK Pattern/Password/PIN NO USB DEBUG REQUIRE.
6. Remove Face Lock
7. Remove Voice/Facelock - Comes in Most Android 4.x
8. Remove Signature Lock - comes in New Samsung Note 3 Series.
9. Remove Finger Print Lock - comes in New Samsung S5 Series
10. Batch Apk Installer - Both Internel / Externel Memories / Force Mode
SAMSUNG Android
- No Need USB Debug Required
- Remove Pattern Unlock
- Remove Password Unlock
- Remove Pin Unlock
Nokia Android Tool
- Added Read Info
- Rebooter - Fastboot - Normal - Cwm
- One Click Root
- Install Kitkat Launcher
- Install Google Services
- Uninstall Google Services
- Flash ClockworkMod Recovery
- x Flasher
- Flash Boot,Recovery,System,variant,Data,Cache,preload..
Root Tool
- Manual Root 4 Methods (Support Wide Range of Devices)
- Smart Root Tests All Availble Exploits with one Click
Maat Pro Editor Tool
- Read/Backup/Edit Gps.conf
- Read/Backup/Edit Hosts
- Read/Backup/Edit/Update Latest Hosts
- Read/Backup/Edit Build.Props
- Read/Backup/Edit Hw-config
And it's all free for you...
Software Picture :

Software & Crack link :
Miracle_Advance_Android_Tool_v1.2 - Cracked
Download
MAAT_1.2_LOADER_DzCraXx
Download
* How to install and run :
1 - Install Maat 1.2.exe
2 - copy MAAT_1.2_LOADER_DzCraXx.exe to install folder [C:\Program Files\Maat]
3 - double-click MAAT_1.2_LOADER_DzCraXx.exe
N-Joy ! this fine release from DxCraXx.

2:20 PM
kingstar a20 Pettan lock Solution With out Flash
how to hard reset king star a20 without flash how to hard reset micro max a51 without flash
Broad-com cpu pattern-lock remove solution 100% Tasted without flash
Broadcom usb driver
Download PdaNet
Download Unlock Root Tool
Download Miracle Advance Android Tools
03 January 2015
9:36 PM
SPhone X1 Oficial Firmware With Password
SPhone X1 Official Firmware With Password
Bin File Here Go This Link .............
Subscribe to:
Comments (Atom)


![[IMG]](http://s9.postimg.org/nraz3q533/screenshot_1.png)


![[IMG]](http://s9.postimg.org/gaq2jt0sf/screenshot_4.png)


![[IMG]](http://s25.postimg.org/6b4htv0pr/screenshot_75.png)
![[IMG]](http://s25.postimg.org/3w6b6y0nz/downloadbutton.gif)


